LiquidityZones
LiquidityZones is a built-in TypeScript strategy from @tradejs/strategy-liquidity-zones.
It builds liquidity zones from swing highs/lows, waits for retests, and trades reactions from those zones.
Visual overview
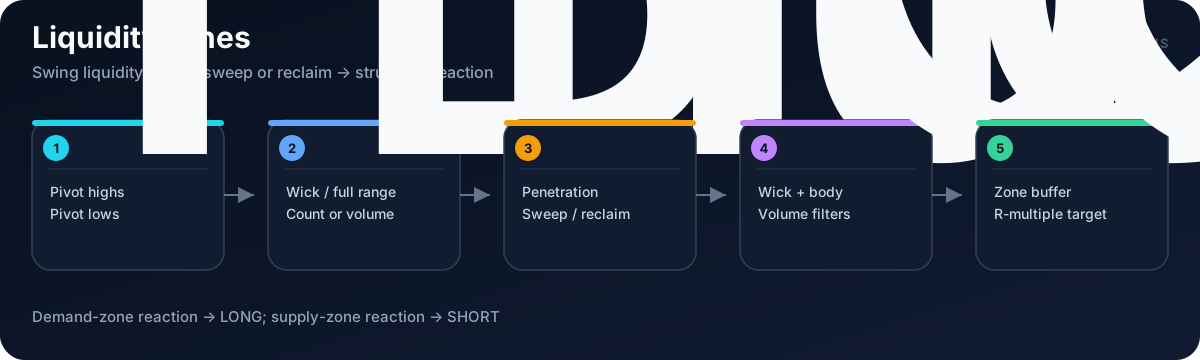
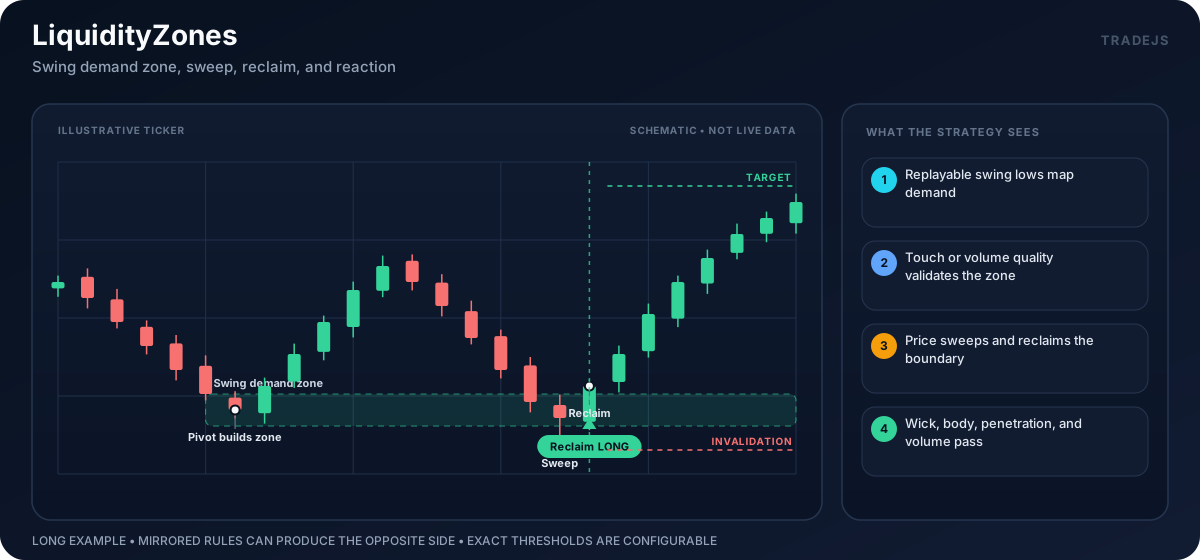
The illustrations are schematic, not market data. Exact thresholds, confirmation rules, and risk parameters come from the active strategy config.
Entry Logic
- Builds active liquidity zones from pivots.
- Skips until a zone retest signal appears.
- Selects
LONGorSHORTside config from signal direction. - Builds a stop buffer from zone height and
LIQUIDITY_ZONES_STOP_BUFFER_PCT. - Places stop outside the retested zone.
- Computes target from
LIQUIDITY_ZONES_TARGET_R_MULT. - Sizes quantity from
MAX_LOSS_VALUE / riskDistance, using theRISK_FEE_RATE,RISK_SLIPPAGE_BPS, andRISK_MARKET_IMPACT_BPSestimates. - Returns
entrywith zone figures andliquidityZonesContext.
Entry codes:
LIQUIDITY_ZONES_BULLISH_RETESTLIQUIDITY_ZONES_BEARISH_RETEST
Exits
When a position exists:
LIQUIDITY_ZONES_OPPOSITE_RETEST_EXITwhenLIQUIDITY_ZONES_EXIT_ON_OPPOSITE_RETEST=trueand the opposite retest appears.- otherwise
POSITION_EXISTS.
Configuration keys
The keys are grouped by purpose. A listed _LONG or _SHORT key overrides
the unsuffixed value for that direction.
| Group | Keys | Purpose |
|---|---|---|
| Runtime and decision services | ENV, INTERVAL, MAKE_ORDERS, CLOSE_OPPOSITE_POSITIONS, BACKTEST_PRICE_MODE, AI_ENABLED, AI_MODE, MIN_AI_QUALITY, ML_ENABLED, ML_THRESHOLD | Select the runtime mode and candle interval, control order placement, and enable optional AI or ML decisions. |
| Shared indicators | MA_FAST, MA_MEDIUM, MA_SLOW, OBV_SMA, ATR, ATR_PCT_SHORT, ATR_PCT_LONG, BB, BB_STD, MACD_FAST, MACD_SLOW, MACD_SIGNAL | Set the periods used to build shared market context and signal filters. |
| Zone construction | LIQUIDITY_ZONES_PIVOT_LOOKBACK, LIQUIDITY_ZONES_SWING_AREA_MODE, LIQUIDITY_ZONES_FILTER_MODE, LIQUIDITY_ZONES_MIN_FILTER_VALUE, LIQUIDITY_ZONES_SHOW_SWING_HIGH_ZONES, LIQUIDITY_ZONES_SHOW_SWING_LOW_ZONES | Define swing zones, choose wick or full-range bounds, filter by count or volume, and enable high or low zones. |
| Zone age and retest | LIQUIDITY_ZONES_MIN_ZONE_AGE, LIQUIDITY_ZONES_MAX_AGE, LIQUIDITY_ZONES_REACTION_CLOSE_BEYOND_ZONE, LIQUIDITY_ZONES_REQUIRE_REACTION_BODY, LIQUIDITY_ZONES_MAX_RETEST_PENETRATION_PCT | Set the valid zone age and the required reaction and maximum penetration on retest. |
| Reaction quality | LIQUIDITY_ZONES_MIN_REACTION_CLOSE_DISTANCE_PCT, LIQUIDITY_ZONES_MAX_REACTION_CLOSE_DISTANCE_PCT, LIQUIDITY_ZONES_MAX_REACTION_CLOSE_DISTANCE_PCT_LONG, LIQUIDITY_ZONES_MAX_REACTION_CLOSE_DISTANCE_PCT_SHORT, LIQUIDITY_ZONES_REQUIRE_RANGE_RECLAIM, LIQUIDITY_ZONES_REQUIRE_SWEEP_RECLAIM, LIQUIDITY_ZONES_MIN_REJECTION_WICK_SCORE, LIQUIDITY_ZONES_MIN_VOLUME_REL20 | Limit reaction distance and require range or sweep reclaim, rejection wick quality, and relative volume. |
| Target, stop, and exit | LIQUIDITY_ZONES_STOP_ZONE_BUFFER_MULT, LIQUIDITY_ZONES_STOP_BUFFER_PCT, LIQUIDITY_ZONES_TARGET_R_MULT, LIQUIDITY_ZONES_EXIT_ON_OPPOSITE_RETEST | Set the stop outside the zone, target distance, and opposite-retest exit. |
| Figures and side policy | LIQUIDITY_ZONES_MAX_FIGURE_ZONES, MAX_LOSS_VALUE, LONG.*, SHORT.* | Limit chart zones, set the loss budget, and configure each direction. |
Signal Payload
The strategy stores:
additionalIndicators.liquidityZonesContext- zone figures from
buildLiquidityZonesFigures(...) - stop outside the retested zone
- one take-profit at the computed target
Common Skip Reasons
NO_LIQUIDITY_ZONE_RETESTPOSITION_EXISTSDEV_TRADE_COOLDOWNSTRATEGY_DISABLEDINVALID_STOPINVALID_QTYRISK_RATIO:<value>
Validation Notes
Compare wick_extremity vs full_range carefully. Zone width, provider wick quality, and retest penetration settings can change signal frequency.